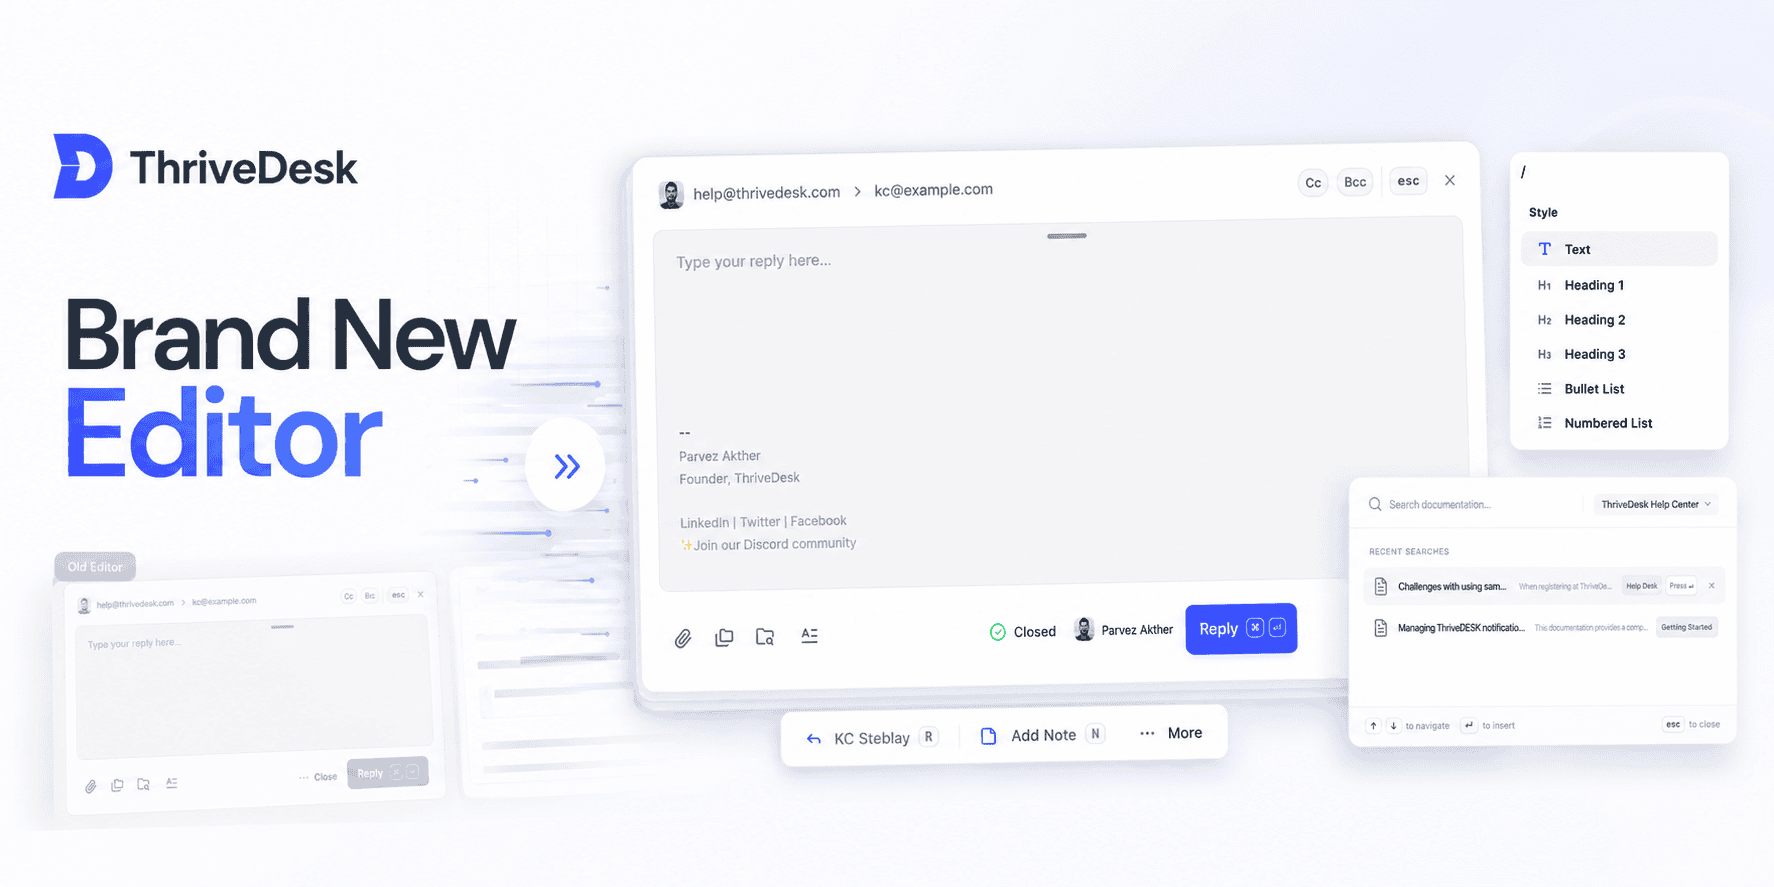
Faster, cleaner, and packed with the features you asked for.
We just launched a completely redesigned editor — built from the ground up to make replying, drafting, and note-taking smoother and more powerful.
Whether you’re sending a reply, adding a note, or working with saved drafts, the new editor is here to make it feel effortless.
Fresh Minimal UI
A cleaner, more focused workspace. Status, assignee, sender, and recipient fields are better organized so you can focus on writing, not hunting for controls.
Resize It Your Way
Need more room? Drag the editor taller. Prefer a compact chat-like view? Keep it small. It works however you like.
Preview Without Opening
Quickly preview replies and notes without having to open the editor. See what’s saved and jump back in only when you’re ready.
Smarter Drafting
Drafts now autosave in real-time and stay visible even if you close the editor. You can delete, reopen, or continue anytime — no more guessing if something saved.
Markdown + Slash Commands
Type faster with Markdown shortcuts and Notion-style / commands. Headings, code blocks, lists — all formatted without touching your mouse.
Redesigned Knowledge Base Search
The built-in article search is faster and returns better results. Find the right help article while replying, without breaking your flow.
Variable Chips
Variables now appear as visual “chips,” making them easy to insert, review, and edit in replies. It’s a subtle upgrade that makes templated replies cleaner and less error-prone.
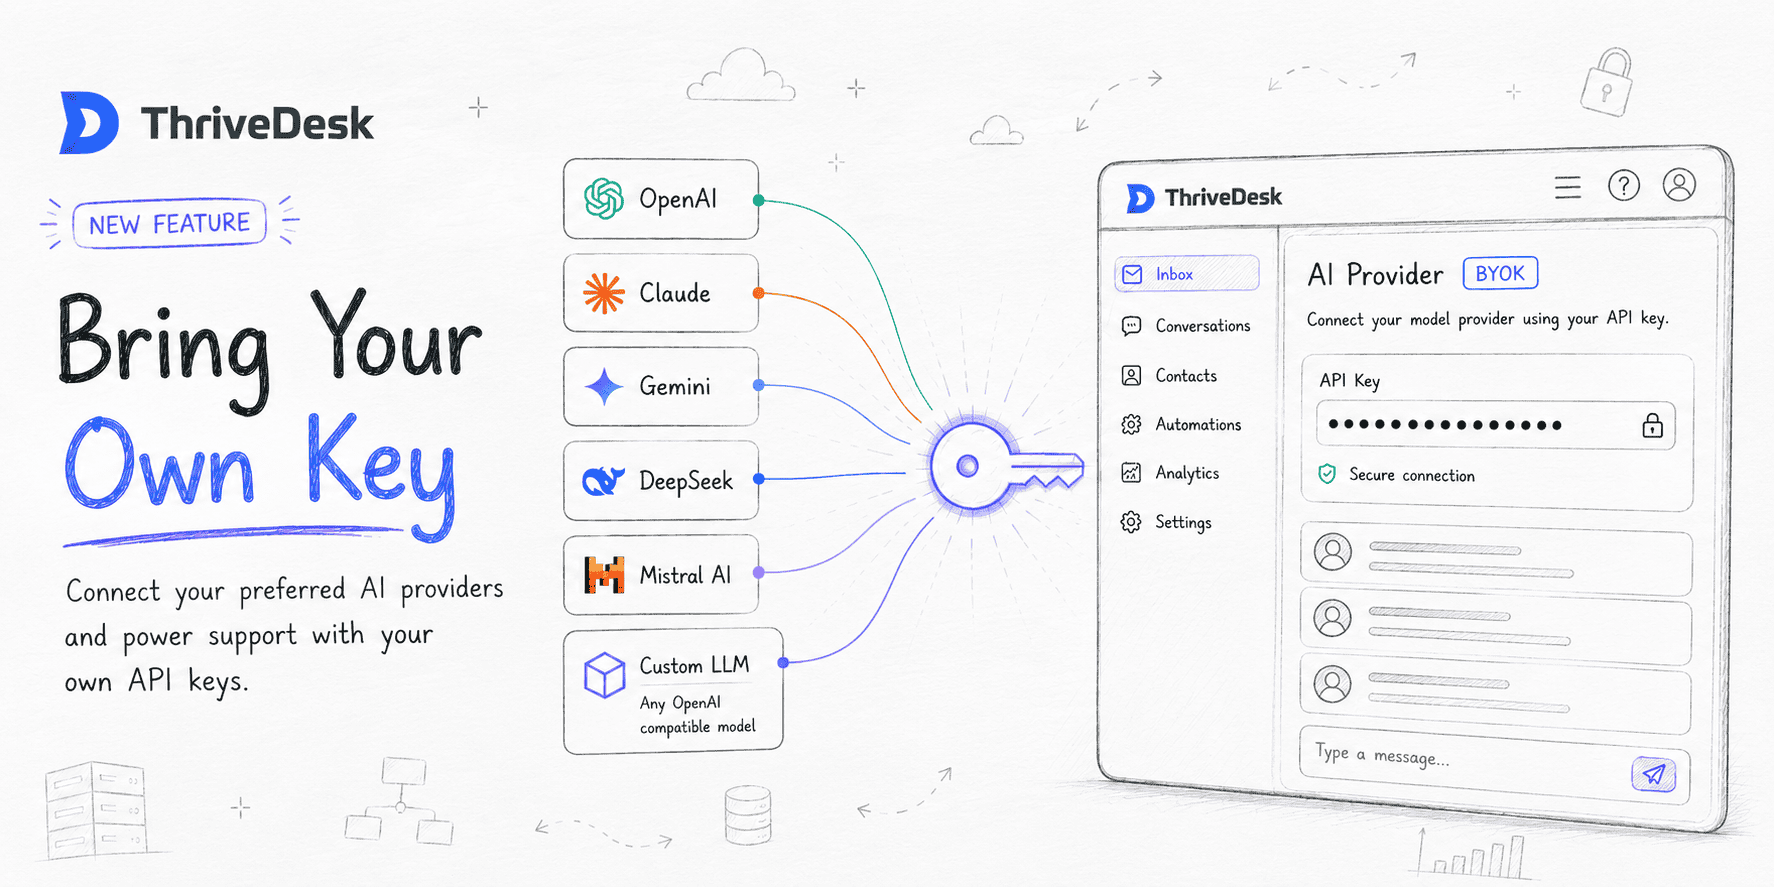
Par défaut, ThriveDesk utilise nos propres modèles gérés pour alimenter l'assistance IA, la synthèse et les réponses automatiques. Apportez votre propre clé (BYOK), Vous pouvez désormais connecter vos propres identifiants API de n'importe quel fournisseur majeur d'IA et exécuter les fonctionnalités d'IA de ThriveDesk sur le modèle qui convient le mieux à votre équipe.
Vous pouvez désormais connecter votre propre fournisseur d'IA et utiliser votre propre clé API directement dans ThriveDesk. Que votre équipe préfère OpenAI, Claude, Gemini ou un autre fournisseur compatible, vous avez maintenant la possibilité de choisir le modèle le mieux adapté à votre entreprise.
Fournisseur
Modèles populaires
OpenAI
GPT-4o, GPT-4 Turbo, GPT-3.5
Anthropique
Claude 3.5 Sonnet, Claude 3 Opus
Gémeaux
Gemini 2.0 Flash, 1.5 Pro
Azure OpenAI
GPT-4, GPT-3.5 Turbo
Grok (xAI)
Grok-3, Grok-2
DeepSeek
DeepSeek-V3, DeepSeek-R1
Comment se connecter
Rendez-vous à Paramètres → Paramètres IA → Apportez votre propre clé, Choisissez un fournisseur, collez votre clé API, sélectionnez un modèle et enregistrez. ThriveDesk vérifie automatiquement vos identifiants. Activez ensuite le fournisseur : vos fonctionnalités d’IA seront instantanément activées.
Un seul fournisseur peut être actif à la fois. Changer de fournisseur se fait d'un simple clic.
Repli intelligent
Si votre clé expire, si vous n'avez plus de crédits ou si le fournisseur tombe en panne, ThriveDesk vous avertira par e-mail et basculera automatiquement sur ThriveDesk AI (Neo) afin que votre équipe reste ininterrompue.
Comment fonctionnent les crédits IA
Une question qui nous a été posée lors des tests bêta est la suivante :
“ Si j’utilise ma propre clé API, pourquoi ai-je encore besoin de crédits ThriveDesk AI ? ”
La réponse est simple : lorsque vous utilisez BYOK, vous intégrez le modèle d’IA, mais ThriveDesk fournit toujours la couche d’intelligence qui rend l’IA utile au sein du support client.
Chaque action d'IA effectuée via BYOK consomme uniquement 1 crédit ThriveDesk AI par tâche. Que vous génériez une réponse, résumiez une conversation, traduisiez un message ou utilisiez l'assistance de l'IA, chaque action coûte un crédit.
Notre objectif était de maintenir une tarification transparente et prévisible tout en permettant aux équipes de bénéficier de l'infrastructure d'IA de ThriveDesk.
Pas encore prêt à changer ? ThriveDesk AI (Neo) reste activé par défaut et ne nécessite aucune configuration. Vous pouvez revenir en arrière à tout moment en désactivant simplement votre fournisseur personnalisé.
Disponible sur le Formule standard et supérieures.
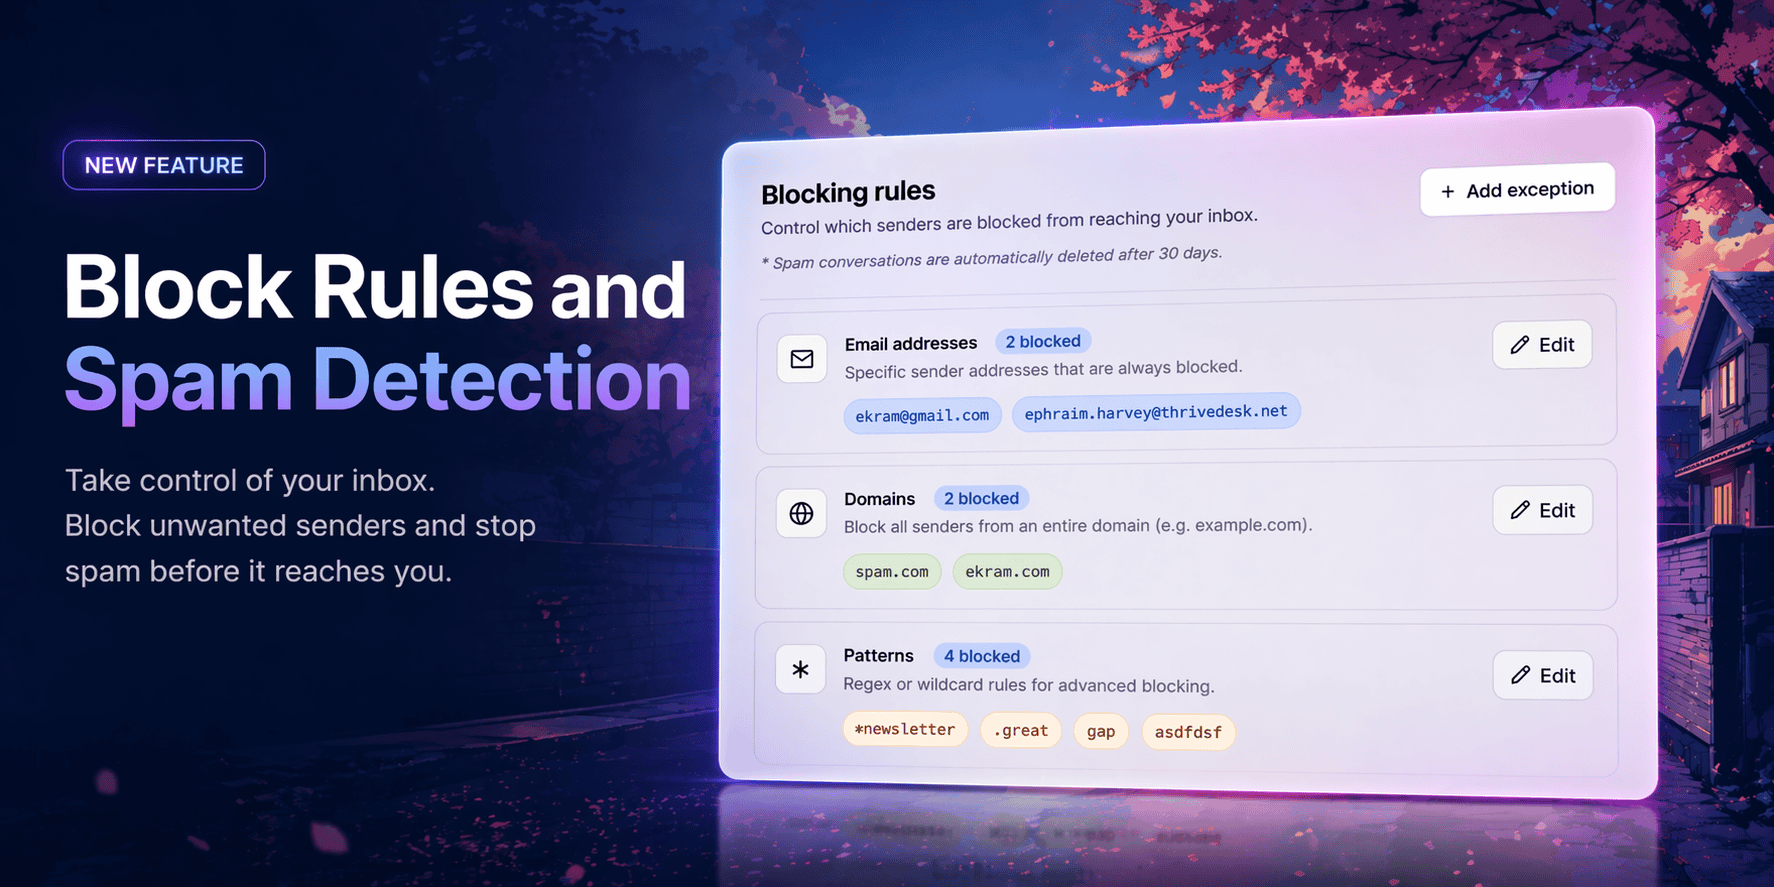
Votre boîte de réception ne devrait contenir que les conversations importantes, éliminez le superflu..
Les spams et les expéditeurs indésirables font perdre du temps à votre équipe. Vous avez désormais un contrôle total sur ce qui arrive dans votre boîte de réception et sur ce qui n'y arrive jamais.
Règles de blocage
Rendez-vous à Paramètres → Règles de blocage Pour configurer votre liste de blocage. Trois façons de bloquer :
Adresses électroniques Bloquez certains expéditeurs par e-mail. Tous les messages provenant de cette adresse seront automatiquement classés comme indésirables et n'atteindront jamais votre boîte de réception.
Domaines — Bloquer un domaine entier en une seule fois. Ajouter spam.com Toutes les adresses de ce domaine sont automatiquement bloquées. Inutile de les ajouter une par une.
Motifs — Pour un contrôle avancé, utilisez des expressions régulières ou des règles avec caractères génériques. Bloquez tout ce qui correspond *bulletin, un TLD spécifique comme .xyz, ou tout autre modèle personnalisé dont votre équipe a besoin.
Les conversations indésirables sont automatiquement supprimées après 30 jours.
Exceptions
Vous avez bloqué un domaine mais vous devez autoriser un expéditeur spécifique ? Utilisez Ajouter une exception Pour autoriser des adresses e-mail individuelles ou des domaines entiers. Tout élément ajouté ici contourne toutes les règles de blocage, sans exception.
Signaler comme spam depuis n'importe quel ticket
Vous n'avez pas besoin d'aller dans les paramètres pour bloquer quelqu'un. Ouvrez une conversation, cliquez sur le menu des options et sélectionnez Signaler comme spam. ThriveDesk confirmera l'action et ajoutera automatiquement cette adresse e-mail à votre liste de blocage. Les futurs messages provenant de cet expéditeur seront automatiquement classés comme spam.
Unspam est tout aussi facile
Vous avez fait une erreur ? Ouvrez la conversation relative aux spams, cliquez Signaler comme non-spam, et ThriveDesk vous proposera de le remettre dans votre boîte de réception et de supprimer le contact de votre liste de blocage, en une seule étape.
L'assistance ne vous attend pas, mais votre équipe non plus. Vous pouvez désormais programmer l'envoi de vos réponses au moment précis, sans avoir à consulter constamment votre boîte de réception.
Rédigez votre réponse quand elle est encore fraîche, choisissez un moment et laissez ThriveDesk s'occuper du reste.
Comment ça marche
Il vous suffit de saisir le message à l'heure à laquelle vous souhaitez l'envoyer. Pas de listes déroulantes, pas de sélecteurs de date. Utilisez des commandes en langage naturel comme :
vendredi prochain à 22h
demain 9h
en 3 heures
ThriveDesk l'analyse instantanément et confirme la date et l'heure exactes avant votre engagement.
Conditions d'envoi
Toutes les réponses programmées ne doivent pas être déclenchées systématiquement. C'est pourquoi nous vous proposons deux options :
Si aucune réponse — N'envoie votre message que si le client n'a pas répondu avant l'heure prévue. Idéal pour les relances que vous ne souhaitez pas envoyer deux fois.
Indépendamment de — Envoi garanti en toutes circonstances. Idéal pour les messages urgents, les rappels ou les confirmations.
Planification tenant compte du fuseau horaire
Les réponses programmées respectent votre fuseau horaire de l'agent, pour que les messages arrivent à la bonne heure locale, et non à 3 h du matin. Assurez-vous que votre fuseau horaire est correctement configuré dans les paramètres. Paramètres → Personnel → Préférences.
Gérez tout à partir de la file d'attente ultérieure
Toutes vos réponses programmées sont disponibles dans le Plus tard Dans la barre latérale de votre ticket, modifiez ou annulez toute réponse programmée avant son envoi : contrôle total, aucune mauvaise surprise.
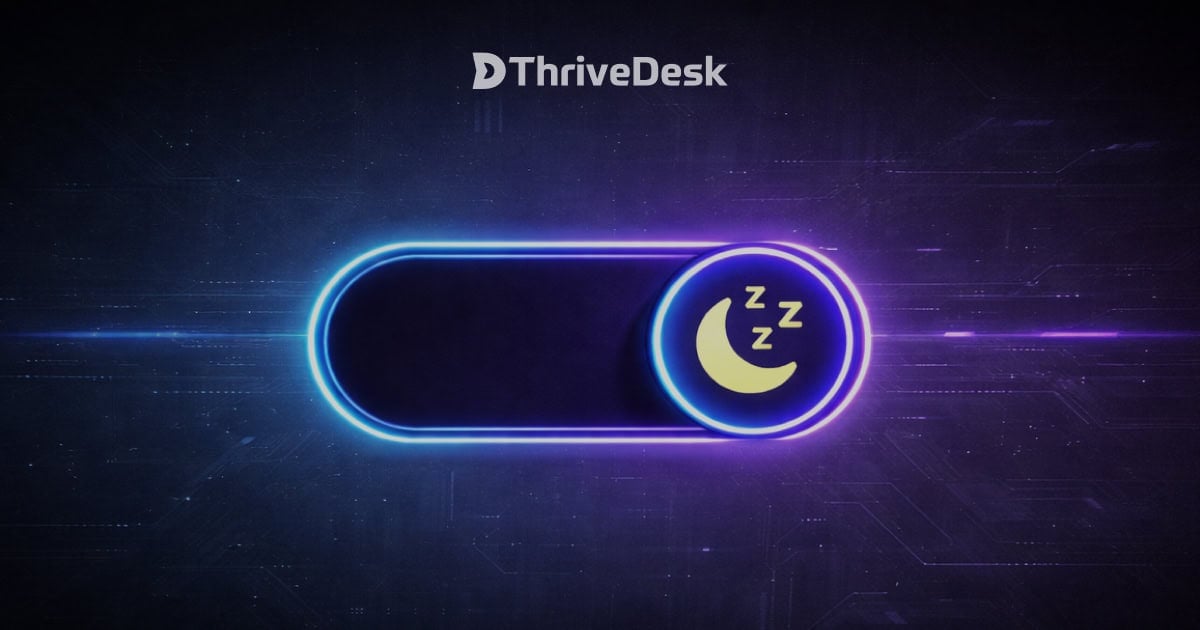
Tous les tickets ne nécessitent pas votre attention immédiatement. Mettez-les de côté, et ils reviendront au moment opportun.
Certaines conversations ne sont pas urgentes aujourd'hui, mais elles auront leur importance plus tard. Besoin d'une réponse client ? En attente d'une mise à jour interne ? Au lieu de laisser des tickets encombrer votre boîte de réception — ou pire, de les oublier complètement —, vous pouvez désormais les mettre en veille et les faire réapparaître au moment opportun.
✨ Faites une sieste où que vous soyez
Vous n'avez pas besoin d'ouvrir une conversation pour mettre une notification en veille. ThriveDesk vous propose trois façons de le faire :
En-tête de conversation — cliquez sur l'icône d'horloge dans le coin supérieur droit de n'importe quelle conversation ouverte
Réponse de l'éditeur — Mettez votre téléphone en veille pendant que vous rédigez une réponse, directement depuis la barre d'outils inférieure.
Liste de conversation — Cliquez avec le bouton droit sur n’importe quelle conversation ou utilisez le menu d’options directement depuis votre boîte de réception
Saisie temporelle en langage naturel
Lorsque vous appuyez sur le bouton snooze, un Dormez jusqu'à… Une fenêtre modale s'affiche. Tapez « en anglais simple » lorsque vous souhaitez la faire réapparaître :
demain à 15h
mercredi prochain
en 2 heures
vendredi 10h
Ou utilisez un format précis comme 03/05/2026 08:00 Si vous avez besoin d'un contrôle précis, ThriveDesk vous confirmera la date et l'heure exactes avant que vous ne confirmiez.
Deux conditions de sieste
Choisissez le comportement de la fonction « snooze » si le client répond prématurément :
Si aucune réponse — La fonction « Répéter » est automatiquement désactivée si le client répond avant l’heure prévue. C’est le comportement par défaut et le choix idéal pour les relances.
Indépendamment de Le billet reste en veille jusqu'à l'heure choisie, quoi qu'il arrive. Pratique si vous devez le réactiver à votre convenance.
Gérer les conversations en suspens
Toutes les conversations mises en pause se déplacent vers le Plus tard Un dossier dans votre barre latérale — hors de votre boîte de réception active, mais jamais hors de portée.
A icône d'horloge jaune Une icône apparaît au-dessus de l'avatar du contact dans la liste des conversations, vous permettant ainsi de voir en un coup d'œil les messages mis en veille.
Survolez l'icône d'horloge dans l'en-tête de n'importe quelle conversation pour voir l'heure exacte de réapparition.
Besoin de reprogrammer ? Cliquez à nouveau sur l’icône d’horloge, choisissez une nouvelle heure et appuyez sur Mise à jour Snooze
Besoin de le récupérer immédiatement ? Ouvrez la conversation, cliquez sur l’icône d’horloge et appuyez sur le bouton rouge. Réveillez-vous button
Configuration du fuseau horaire
Les heures de répétition tiennent compte du fuseau horaire de votre agent — donc un 9h La fonction « Répéter » s'active à 9 h chez vous, et non à l'heure du serveur. Définissez votre fuseau horaire en cliquant sur votre avatar en bas à gauche, puis en le sélectionnant dans le menu déroulant. Vous pouvez également y accéder directement depuis la fenêtre modale « Répéter ». mettre à jour le fuseau horaire lien.
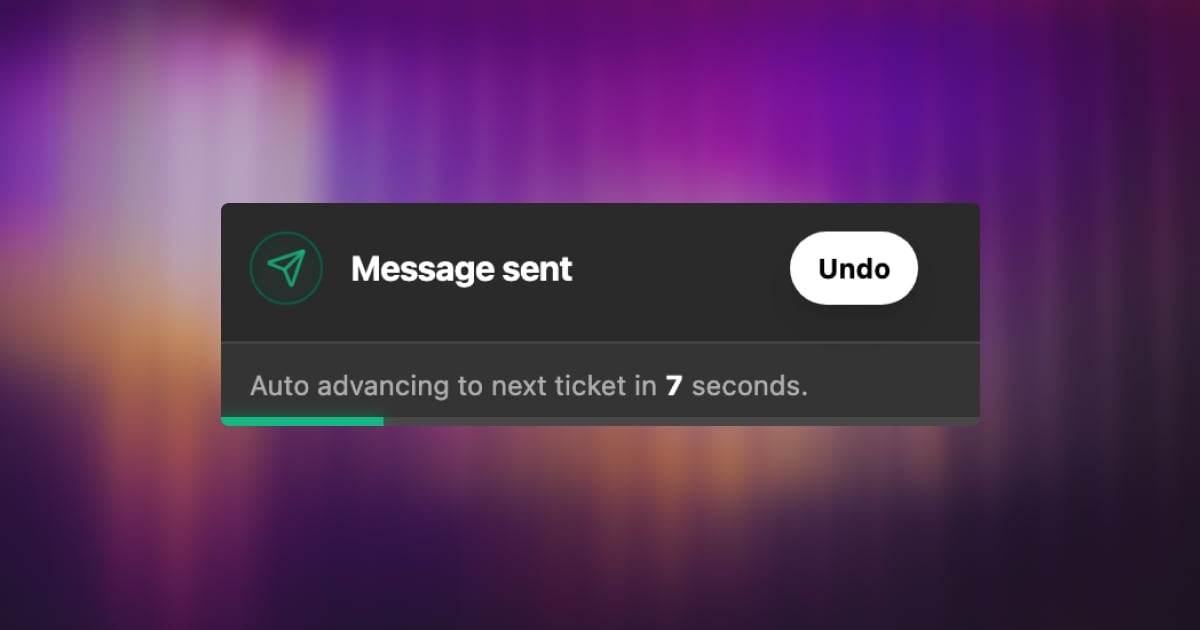
Envoyé trop tôt ? Vous avez maintenant une seconde chance.
Ça nous est tous arrivé : vous cliquez sur Envoyer et vous vous apercevez aussitôt d’une faute de frappe, vous réalisez que vous avez oublié une pièce jointe, ou vous changez tout simplement d’avis. À partir d’aujourd’hui, vous disposez d’un court délai pour annuler votre envoi.
Annuler Envoyer retarde l'envoi de vos courriels de quelques secondes, vous laissant juste le temps de les annuler avant que le message ne quitte votre boîte de réception.
Comment ça marche
Une fois activée, chaque réponse que vous envoyez sera brièvement mise en attente avant d'être publiée. Un compte à rebours s'affiche ; si vous souhaitez annuler, un simple clic suffit. Fini les relances embarrassantes et les messages du type “ veuillez ignorer mon dernier message ”.”
Fenêtre d'annulation configurable
Vous choisissez la durée du délai. Rendez-vous sur Paramètres → Personnel → Préférences → Annuler l'envoi et choisissez ce qui vous convient :
5 secondes
10 secondes
15 secondes
20 secondes
30 seconds
Une fenêtre plus longue offre plus de marge de manœuvre. Une fenêtre plus courte permet de rester concentré. À vous de choisir.
Petit détail, grand soulagement. Parfois, le plus précieux atout d'un outil est de permettre de corriger une erreur avant qu'elle ne se produise.
Renseignez-vous mieux sur le contexte avant même que la conversation ne commence.
Le mois dernier, nous avons lancé Champs personnalisés pour les billets — donnant ainsi à votre équipe la possibilité de capturer des données structurées directement dans chaque conversation.
Aujourd'hui, nous allons encore plus loin.
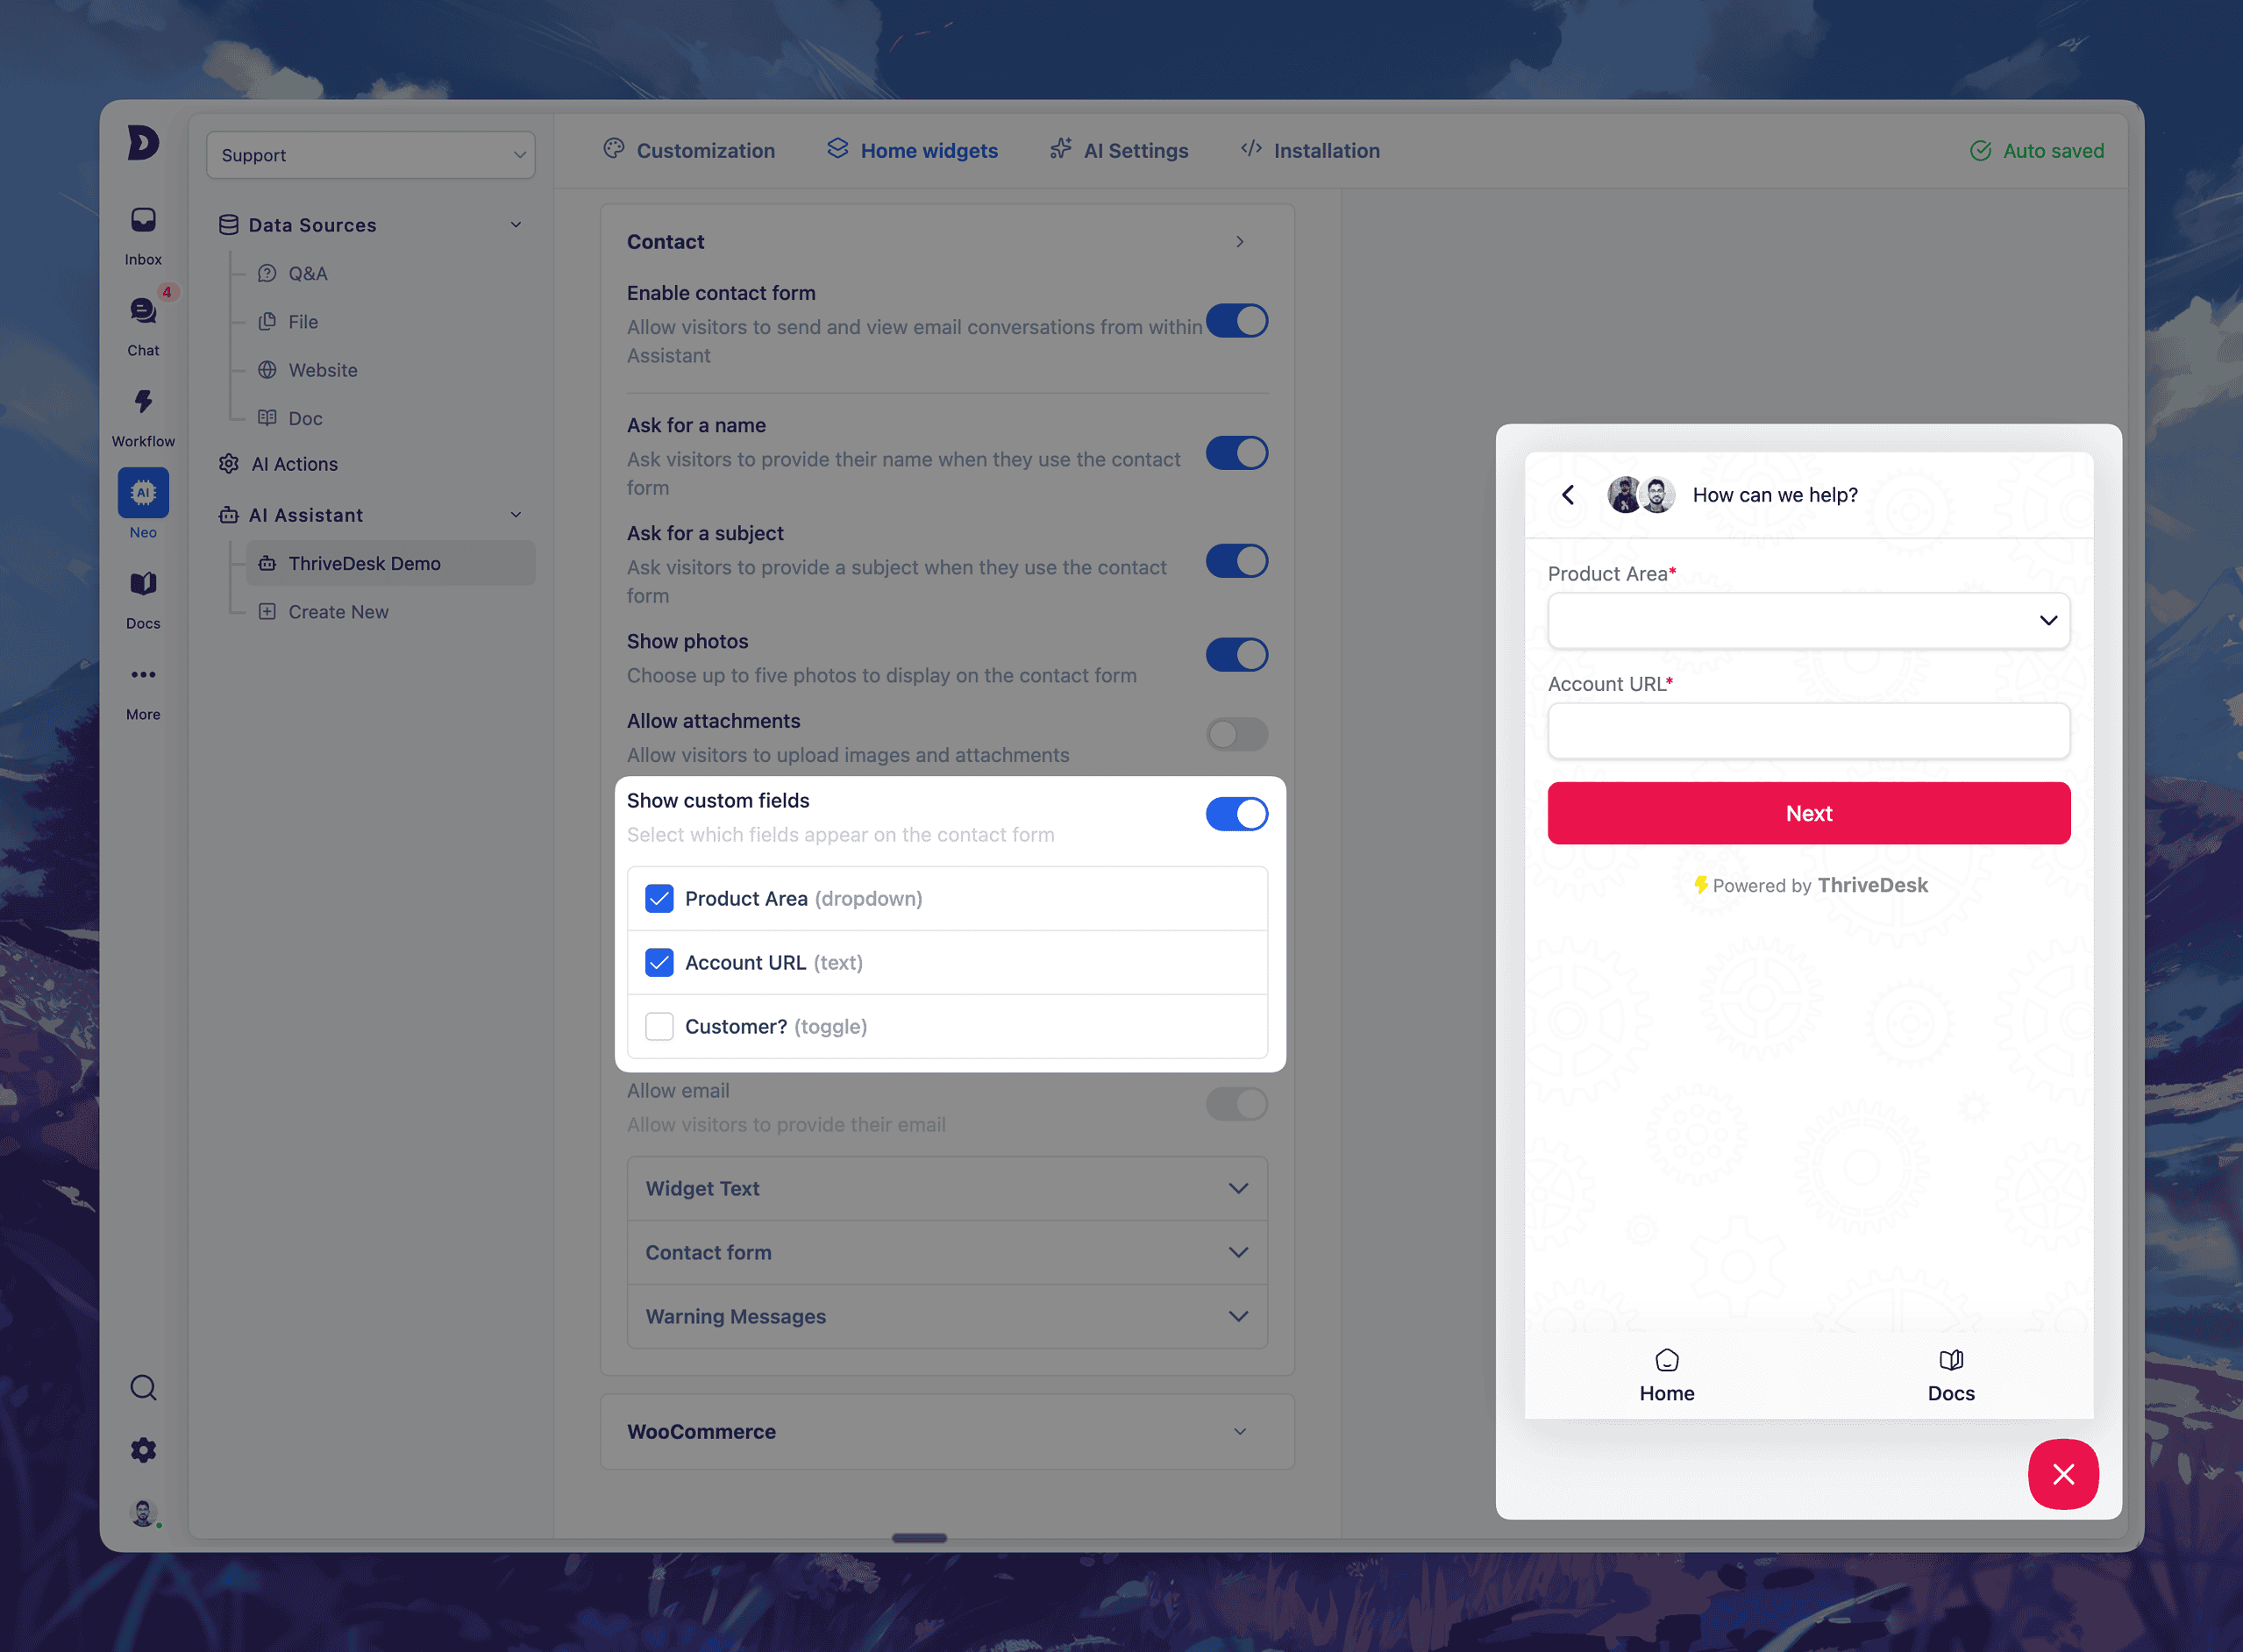
Vous pouvez maintenant Ajoutez des champs personnalisés au formulaire de contact de votre assistant – vous offrant ainsi des informations plus complètes avant même la création d'un ticket.
✨ Quoi de neuf
Sélectionnez jusqu'à 5 champs personnalisés à inclure dans le formulaire de contact de votre assistant
Types de champs pris en charge : liste déroulante, champ de texte et bouton bascule
Vos visiteurs devront remplir ces formulaires avant d'envoyer un message.
Toutes les réponses apparaissent directement dans la barre latérale du ticket.
Cela signifie moins d'allers-retours, un meilleur routage et des résolutions plus rapides.
💡 Utilisez-le pour :
Demandez les numéros de commande, les zones de produits, les URL de compte ou les balises personnalisées
Attribution automatique des billets en fonction des sélections dans une liste déroulante
Collectez les informations clés avant même que votre équipe ne réponde.
L'installation est facile : il suffit de se rendre sur Neo → Open Assistant → Widgets d'accueil → Formulaire de contact → Champs personnalisés, Activez les options dont vous avez besoin et passez en direct.
Améliorations et corrections de bugs
Cœur de métier
Refonte : refonte et modernisation de l'architecture de base
Correction : Affichage encombré de la boîte de réception
Correction : Le dossier Brouillons affiche les e-mails envoyés
Correction : problème de changement de contact non fonctionnel
Correction : problème de lien actif
Correction : problème d'état de recherche
Correction : erreur « assistant introuvable »
Correction : Appels API NEO infinis
Correction : problème d'affichage des données EDD
Correction : Problème de brouillon résolu
Correction : Problème de duplication d'assistant résolu
Correction : Gestion de la navigation de l'assistant orphelin
Correction : problème de sauvegarde des paramètres d'IA dans l'assistant
Correction : problème de visibilité de la fenêtre modale de vérification des e-mails
Base de connaissances
Correction : Problème de sélection des catégories en vedette en fonction des slugs séparés par des virgules
Correction : Problème d'insertion de liens Vimeo dans l'éditeur
Correction : Les liens de la table des matières défilaient derrière l'en-tête fixe dans la mise en page de la documentation
Fonctionnalité : API de base de connaissances
Fonctionnalité : Sauvegarde automatique et gestion des versions des articles
Application mobile
NOUVEAU : Actions de balayage sur les billets
NOUVEAU : Mentions dans les notes
Nouveauté : nouvelle page de tableau de bord pour une meilleure visibilité.
Amélioration : ajout de contexte et d'informations supplémentaires au bouton (i) de la fonction de chat en direct.
Nous démarrons l'année 2026 avec notre première sortie majeure de l'année : Champs personnalisés pour les billets. Cette nouvelle fonctionnalité puissante vous permet de personnaliser votre système de billetterie pour l'adapter à vos flux de travail uniques, sans aucune ligne de code.
Que vous ayez besoin de suivre le niveau d'abonnement d'un client, la version d'un produit, un statut interne ou toute autre information, vous pouvez désormais enregistrer ces données directement dans chaque ticket.
Le résultat ? Un soutien structuré et contextualisé qui s'adapte aux besoins de votre équipe et améliore son efficacité dès le premier jour.
Pourquoi les champs personnalisés ? Un support enrichi par le contexte
Chaque équipe de support a son propre flux de travail et ses propres besoins en données. Custom Fields vous permettent de collecter et d'organiser des données supplémentaires sur les billets, au-delà des champs standard. Imaginez pouvoir enregistrer… version du produit, niveau de clientèle, catégorie de problèmes, ou tout autre détail important relatif à une conversation – le tout dans la vue du ticket. Grâce à ces champs, vous pouvez :
Étendez les données que vous collectez sur chaque billet, en veillant à ce que toutes les informations pertinentes soient enregistrées.
Maintenir des données cohérentes et structurées utilisation d'options prédéfinies (fini les notes libres et désordonnées).
Améliorer les rapports et l'automatisation Filtrez et générez des rapports sur les valeurs des champs personnalisés. Identifiez facilement les tendances ou déclenchez des flux de travail à partir des données de champs.
Ne manquez jamais d'informations cruciales – marquer les champs importants comme requis, Les agents doivent donc les remplir avant d'envoyer une réponse. Aucun détail important n'est négligé.
En bref, les champs personnalisés transforment vos tickets en une mine d'informations structurées. Votre équipe obtient une vue d'ensemble complète de chaque problème en un coup d'œil, et vos responsables disposent de données claires pour analyser et optimiser les opérations de support.
Nouveaux types de champs – Aucun code requis
Nous avons conçu les champs personnalisés pour qu'ils soient suffisamment flexibles pour recueillir différents types d'informations sans aucune programmation ni configuration technique. Vous pouvez choisir parmi quatre types de champs lors de la création d'un champ personnalisé :
Dérouler: Une liste prédéfinie d'options à sélectionner (idéale pour les catégories de problèmes ou les domaines de produits, par exemple). Créez vos propres options : aucune programmation, il suffit de pointer et de cliquer.
Texte sur une seule ligne : Un champ de texte libre sur une seule ligne pour les entrées courtes (par exemple un numéro de commande ou une courte note).
Texte multiligne : Une zone de texte plus grande pour les saisies plus longues (idéale pour les descriptions, les notes internes ou les étapes de dépannage).
Basculer: Un simple interrupteur marche/arrêt pour les valeurs oui/non ou vrai/faux (idéal pour les données booléennes comme “ Client payant ? ” ou “ Problème urgent ”).
Il suffit de quelques clics dans le Paramètres de la boîte de réception Pour ajouter un nouveau champ, aucun script ni formulaire à coder. En fait, créer un champ personnalisé est aussi simple que de le nommer, de choisir son type et, s'il s'agit d'une liste déroulante, d'ajouter les options.
Une fois créés, les champs personnalisés sont actifs. exactement là où vous en avez besoin: dans l'interface de billetterie. Vous pouvez même définir des valeurs par défaut ou marquer les champs comme obligatoires à l'aide d'un bouton.
Si un champ est marqué requis, Les agents seront invités à compléter le formulaire avant d'envoyer une réponse, garantissant ainsi la collecte systématique des données importantes. L'objectif est de rendre la collecte de données structurées fluide et de l'intégrer naturellement au flux de travail.
Expérience fluide avec billet
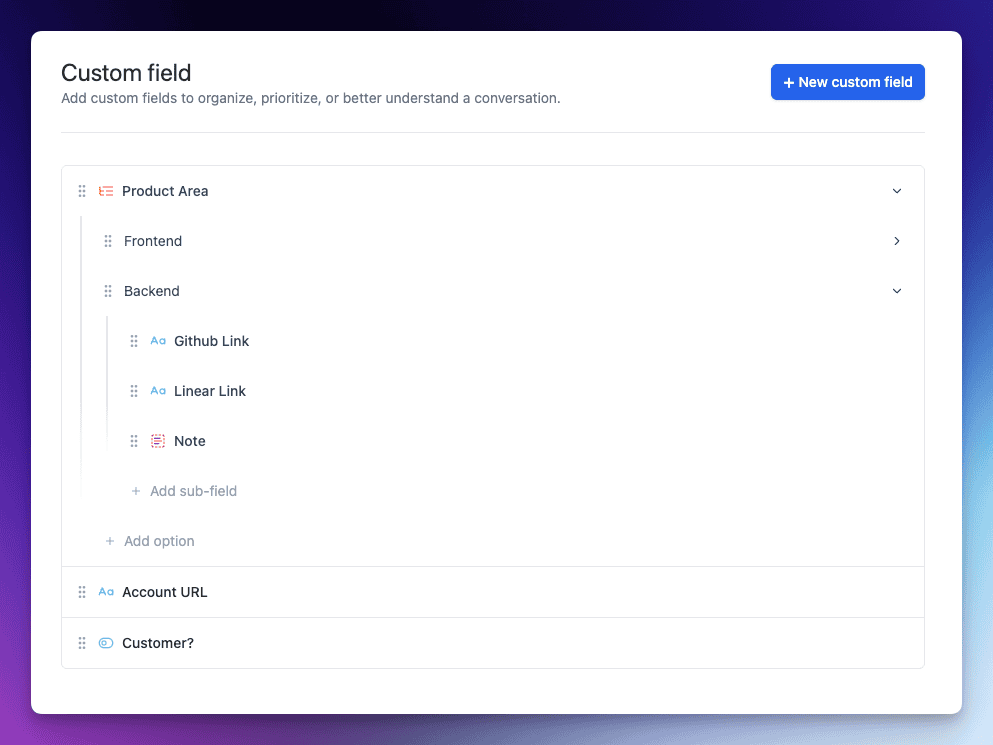
Les champs personnalisés sont parfaitement intégrés à la barre latérale de chaque ticket, offrant aux agents un accès immédiat au contexte. Dans cet exemple, la sélection d'un “ Domaine produit ” affiche des sous-champs pertinents tels que le lien GitHub, le lien Linear et des notes, pour une présentation claire et en adéquation avec le problème rencontré.
L'interface est propre et accueillant pour les agents. Merci à logique conditionnelle, Vous pouvez configurer les champs pour qu'ils s'affichent ou se masquent en fonction de la valeur d'un autre champ, afin que les agents ne voient que les informations pertinentes pour le ticket qu'ils traitent.
En savoir plus et commencer
Prêt à optimiser votre flux de travail de support grâce aux champs personnalisés ? Nous avons la solution. Découvrez notre Centre d'aide Pour un guide pas à pas sur la configuration et l'utilisation des champs personnalisés, avec captures d'écran et conseils, consultez la documentation complète ici : Documentation des champs personnalisés.
Nous sommes impatients de voir comment vous adapterez ThriveDesk à vos besoins grâce à cette nouvelle fonctionnalité. Les champs personnalisés pour les tickets offrent une multitude de possibilités : un support plus personnalisé, une automatisation plus intelligente et des rapports plus pertinents. Comme toujours, nous avons développé cette fonctionnalité en tenant compte des retours d'équipes comme la vôtre, et nous sommes ravis de constater son impact sur vos opérations quotidiennes.
Une expérience mobile entièrement repensée, conçue pour la rapidité, la clarté et une productivité maximale.
Nous avons entièrement reconstruit l'application iOS ThriveDesk avec une toute nouvelle interface, une navigation améliorée et des outils plus intelligents qui aident les agents à être plus productifs avec moins d'efforts.
Il s'agit de notre mise à jour iOS la plus importante et la plus aboutie à ce jour.
Liste de conversations remaniée
La liste des conversations a été entièrement repensée avec un espacement amélioré, une typographie plus nette et des aperçus de messages plus clairs.
Vous pouvez désormais consulter beaucoup plus rapidement l'état des conversations, les détails des participants et les messages non lus.
Nouvel écran de détails de conversation
Nous avons entièrement repensé l'écran de détail de la conversation afin d'offrir aux agents un flux de travail plus intuitif et productif.
Les informations sont désormais regroupées de manière logique, les boutons d'action sont plus faciles d'accès et l'historique des messages est affiché plus clairement.
Que ce soit pour répondre, attribuer des tâches ou consulter le contexte, tout est plus fluide et plus efficace.
Barre d'action rapide flottante
La nouvelle barre d'action flottante vous suit lorsque vous naviguez au sein d'une conversation.
L'attribution de coéquipiers, la mise à jour des statuts, l'ajout de tags ou la réponse peuvent désormais être effectués en un seul clic.
Cela élimine les défilements inutiles et les navigations dans les menus, vous permettant ainsi de naviguer beaucoup plus efficacement dans les conversations.
Nouvel éditeur de réponses
Répondre est désormais plus rapide et plus pertinent grâce à l'éditeur repensé. Vous pouvez saisir du texte tout en consultant simultanément l'historique complet de la conversation, ce qui évite les pertes de contexte et les erreurs.
La mise en forme est plus nette, la gestion des entrées est plus fluide et les réponses enregistrées fonctionnent parfaitement pour des réponses rapides.
Navigation simplifiée
L'ensemble du système de navigation a été amélioré pour une expérience plus intuitive et fluide. Passer d'une boîte de réception à l'autre, ouvrir des conversations, naviguer entre elles et accéder aux paramètres est désormais beaucoup plus naturel.
Et ensuite ?
Nous améliorons le flux de chat en direct pour une expérience plus fluide sur mobile. La prochaine mise à jour proposera une expérience de chat en direct optimisée et une intégration complète des champs personnalisés.
Veillez à ce que les discussions restent claires, concises et faciles à gérer.
Nous venons de lancer un nouvel outil performant qui aide votre équipe à rester organisée lorsque les conversations abordent plusieurs sujets.
Les e-mails d'assistance s'étendent souvent sur plusieurs questions, demandes de suivi ou problèmes sans lien apparent. Au lieu de tout regrouper dans une seule et longue conversation, vous pouvez désormais… diviser les messages en une toute nouvelle conversation avec un sujet clair et un contexte précis.
Cela permet aux agents d'y voir plus clair, améliore la précision des réponses et garde votre boîte de réception bien rangée.
Comment ça marche
Vous pouvez scinder n'importe quelle partie d'une conversation en seulement deux clics :
Ouvrez le menu des options du message.
Sélectionner Conversation divisée pour créer une nouvelle conversation.
Correction de l'erreur d'affichage du résultat de recherche “ objet objet ”.
Liens vers la documentation corrigés.
Mise à jour de l'application Android
Présentation du dossier “ Tous ”Visualisez instantanément toutes les conversations dans vos boîtes de réception – idéal pour les agents qui souhaitent une visibilité complète sur leurs flux de travail mobiles.
Nouveaux badges d'état de livraisonLes messages s'affichent désormais clairement. Échoué ou Rebondi états pour un dépannage rapide.
Stabilité améliorée : Correction d'un problème où certaines pages de conversation apparaissaient vides.
Améliorations et corrections de bugs
Le texte statique de l'interface utilisateur de Neo peut désormais être traduit, ce qui vous permet de localiser votre expérience d'assistance.
Les titres des pages se mettent désormais à jour instantanément lorsque le sujet change.
Le navigateur de conversation se met à jour correctement lorsque le destinataire change.
Correction d'un problème de filtre non défini sur la page des conversations.
Correction d'erreurs d'exécution non définies.
Largeur du bouton d'assignation corrigée pour éviter les problèmes de mise en page.
Ajout d'un événement de fil de discussion sur l'état manquant pour des mises à jour plus précises.